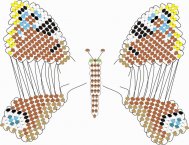
There are such lovely butterflies coming from a desk lamp, here we are. If you like them, we'll do it. It won't take you long.
You're gonna need a colorful basser and a wire to work.
Flying pattern butterflies:
Description of the work of the butter fly:
1. For flying upper wing You'll need about 80 cm wire.
The wire is marked by one biserina, located at the center of the wire (1st row). In one of the free endings, the wires are marked by two basserines (according to the flower gamma) and the other free end of the wire is passed through them to the first (2nd row). Let's go through the scheme.
2. The bottom wings of the butterflies go along the way. Just for work, you'll need a piece of wire about 60 cm.
3. Telece The butterfly is on the diagram, but from the larger biser, since it will be followed by four wires. The ends of the wire at the end of the flight are not cut. At each end, we'll have one basserine at a distance of two, five to three cm from the face. We put a wire through the last biseren of the butterfly, and the ass that we've got, we've got a jug. Now you can cut the wire.
5. Gathering. We're passing through two Bicers of the 5th row of the butterfly, the upper ends of the wire of the lower wings, and the lower row of the 4th row. The top ends of the wires of the upper wings through the 7th row, and in the 2nd row, the bottom. The ends of the wire shall be secured (upper wings with the lower wings shall be secured between the ends of the wire by 2 to 3 rows).


