What's the matter?
Sooner or later, each man-made observes that other smart people don't put crosses like her.
Such misconceptions are often engendered in long discussions in forums about how the right crosses are embedded, on which side the lower and upper crosses should be directed, on which side of the tissue should begin to emplace.
When such a discussion turned around here, it turns out that my way of throwing crosses into a savage for many, and the guest host asked me to write an article on the subject.
And since this topic is already detailed in my course, I decided to give a piece of the lecture to the National Textbook.
 So you're ready to do your first cross or cross.
Before we begin, let's learn the basic rule. baptism:
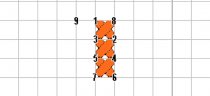
All stitches shall be in one direction:
The lower half-cross is in its upper half-cross.
Failure to comply with this rule will make your stitching gentle, gentle.
Strictly speaking, crosses can be ejected with one. of three ways:
- In the column;
- In line;
- That's right.
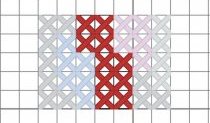
First, let's look at the pole and the line.
The pole-filling means that a single-coloured fragment is regarded as a sequence of columns consisting of baptisms.
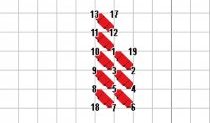
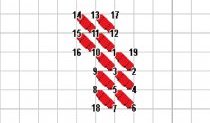
The crust column is in the next way.
At point 1, the thread shall be removed from the face. At point 2, it is taken to the ink. At point 3, it is returned to the face, at point 4 it will be taken to the ink. At point 5, the needle is again placed on the face, at point 6, it is taken to the ink.
That's how we put the lower halfway in two motions. If one move is made, by removing the needle at point 1, we make the first stitch (injection of the needle at point 2 and stabbed at point 3), then we do the second stitch (injection of the needle at point 4 and slit at point 5) and the last stitch (inside of the needle at point 6 and pumped at point 7).